I am re-visiting a long tail knitting cast on. I know has been done many times in the past, however there are many people out there that still have not caught on to the idea, of exactly how it works. Maybe its' too tight, so you give up and do the traditional cast on instead. I know I did it many times too tightly, I've grown to love it and use it all the time.
Here I am beginning a new knitted hat using Wool Ease thick n quick yarn by Lion Brand.
Once you make your beginning slip knot and place it on your needle. Lay the yarn over your open, left palm (right if you're a left handed knitter) with the cast on needle behind as shown.
Open your four fingers as shown and place the yarn at the bottom of the photograph through your pinkie finger and close it. This will hold the yarn that is loose and coming off the ball of yarn.

Here it shows you how the yarn looks between my third finger and pinkie finger. This is how it should look at this point with the cast on needle still in the front as in the first photograph.
Now pick up the cast on needle take it around your index finger from behind, bringing it through your index finger and your second finger, creating a loop.
This is how it will look when the cast on needle is done correctly. The cast on needle with be in the front with the yarn through your index finger and second finger making the loop.
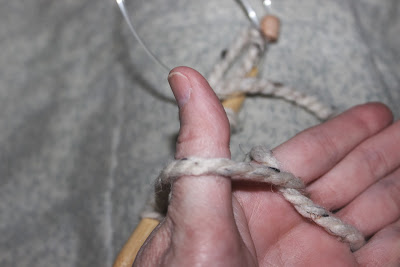
Take the cast on needle over your thumb and rest it a surface as shown. You will see now the yarn is going from the space between the index finger and second finger, over your thumb.
Pick up the cast on needle bringing it toward you around your thumb on top of the yarn, creating another loop. It should look exactly like the photograph.
Next take your knitting needle point and put it through the yarn at the back of your thumb, lifting the needle straight up and off your thumb.
It will look something like this....
Simply pull your yarn and tighten the loop on to the knitting needle. That's it! I noticed this is a tight cast on which was the problem I had with this particular technique. So, what I did, if your using say a size 15 needle step down to a 13, it makes it much easier to get through the tight cast on and begin your row.
Same works for all cast on needles. Cast on with a size 6, take a 5 and do your first row then go back to your 6, often I will do one more row with the smaller needle. I am a person when casting on and knitting my first few rows, does it too loose. This really helped me work it out. I hope this helps those who are having trouble with this technique, once you get it down, you'll love it!
Update...continue just wrapping the yarn around your thumb as in photograph number 7, once you put a cast on stitch on the needle, simply take your needle, give is a bit of a tug to release more yarn through your pinkie and index finger, wrap around your thumb to work another cast on stitch. and working it on to your cast on needle until you have the number of cast on's your pattern requires.
As your knitting your cast on row it will often look like there is a big space between the stitches. This is okay, in fact, this was another reason I gave up, I thought it was to long and wrong. It's not, just pull it a bit tight and...
continue knitting on....


No comments:
Post a Comment
It's nice to meet you! Thank you for taking time to add your thoughts and opinions. Have a wonderful day.